Install Minecraft Java Server as a Windows Service with AlwaysUp

How to Install Minecraft as a Windows Service with AlwaysUp

Automatically start the Minecraft Java Edition Server at boot and keep it running 24/7 in the background, for 100% uptime. No need to log on first.

Minecraft is a critically acclaimed 3D video game developed by Mojang Studios. Enterprising gamers can host their own multiplayer environment by running the Java-based Minecraft server software on their own machine.

To install Minecraft Server as a Windows Service with AlwaysUp:

  1. Download the Minecraft Server JAR file, if necessary.

    Setup Minecraft as per these detailed installation instructions and ensure that it runs and works as expected.

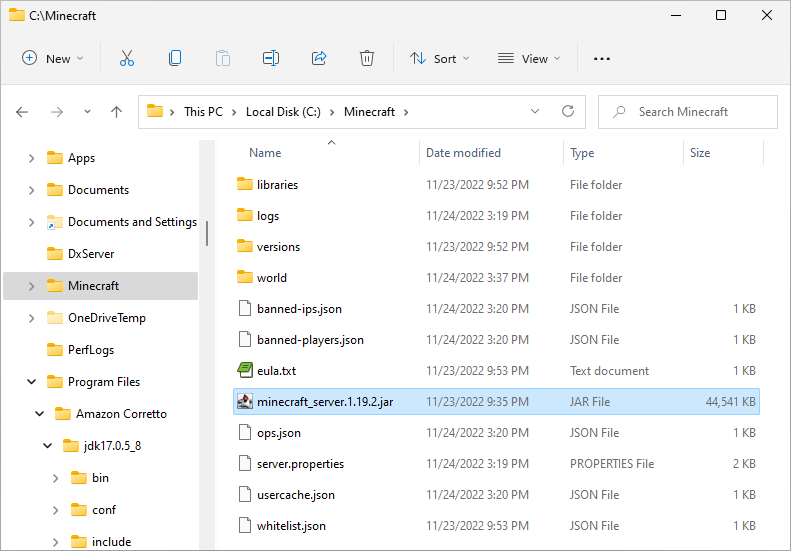
    For this tutorial, we downloaded Minecraft server version 1.19.2 (minecraft_server.1.19.2.jar) and placed it in the "C:\Minecraft" folder:

    Minecraft Installation Folder

    And the recommended Java command launched our server as expected:

    Minecraft Java Edition server running

  2. Download and install AlwaysUp, if necessary.

  3. Start AlwaysUp.

  4. Select Application > Advisor to open the Application Advisor window:

    Start Application Advisor

  5. Click Next to move past the welcome page:

    Application Advisor: Welcome

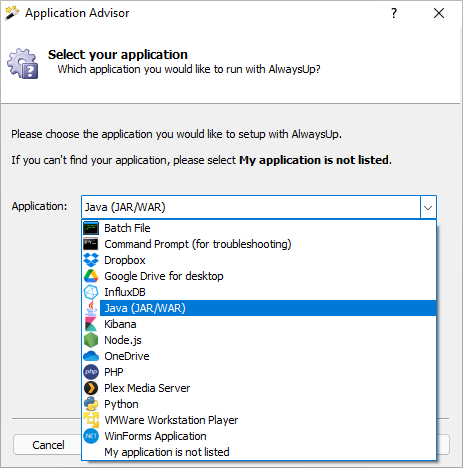
  6. Since Minecraft Server is a Java based product, choose Java (JAR/WAR) from the list of applications.

    Minecraft Windows Service: Select Java (JAR/WAR)

    Click Next to proceed.

  7. AlwaysUp will spend a few seconds figuring out where you installed Java. (We installed the excellent and free Amazon Corretto version 17 on our server.)

    Afterwards, you will be prompted to enter the full path to the Minecraft server JAR file.

    That's "C:\Minecraft\minecraft_server.1.19.2.jar on our system:

    Minecraft Windows Service: Enter JAR file

    Click Next to move on.

  8. The service must run in your user account, where you've installed Java and configured the required environment variables (e.g. RDECK_BASE). Please enter your password:

    Minecraft Windows Service: Enter Windows account password

    Click Next.

  9. The application advisor is done collecting the settings for installing Minecraft server as a Windows Service. Click Next to launch the Add Application window:

    Minecraft Windows Service: Advisor done

  10. Almost done! Just a few more modifications to run Minecraft with he recommended settings.

    1. In the Start in directory field, enter the full path to your Minecraft server installation.

    2. In the Arguments field, add these options at the front of the text:

      -Xmx1024M -Xms1024M
    3. And finally, change the Name field to "Minecraft Server" (or anything else you like).

    Click the Save button to record your settings:

    Minecraft Windows Service: Final modifications

  11. In a few seconds, a new entry for Minecraft will appear in the AlwaysUp window. The service has been installed but it's not running yet (it's in the Stopped state):

    Minecraft Windows Service: Created

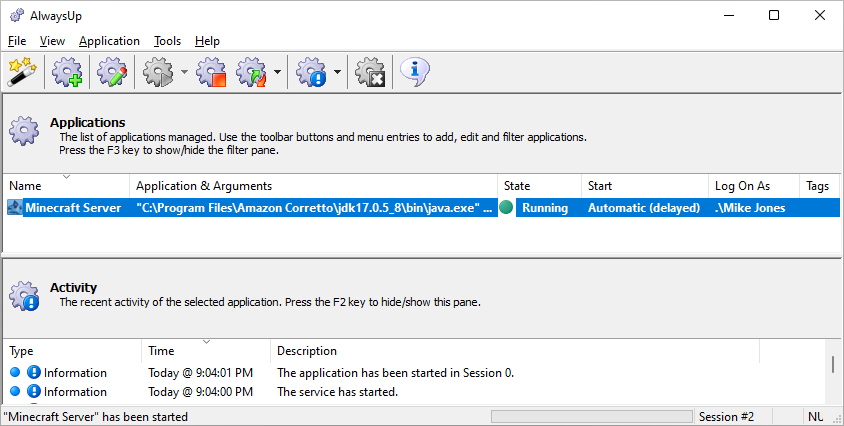
  12. To start Minecraft server as a service, choose Application > Start "Minecraft Server". The state will transition to Running and Minecraft will start invisibly in the background:

    Minecraft Windows Service: Running

  13. That's it! Next time your computer boots, Minecraft server will start automatically, without anyone having to log on to launch it.

    We encourage you to edit Minecraft in AlwaysUp and check out the many other settings that may be appropriate for your environment. Boost priority to give Java more CPU, set up email reports, and much more.


Minecraft not working properly as a Windows Service?

  • With Minecraft running invisibly in the background — in the isolated Session 0 — you won't see any errors its reporting. That can make it difficult to troubleshoot problems!

    To see Minecraft on your desktop, select Restart Minecraft Server in this session from the Application menu:

    Restart Minecraft on your desktop

    The Minecraft server window will appear in a few seconds.

  • Consult the AlwaysUp Troubleshooter — our online tool that can help you resolve the most common problems encountered when running an application as a windows service.

  • From AlwaysUp, select Application > Report Activity > Today to bring up an HTML report detailing the interaction between AlwaysUp and Minecraft/Java. The AlwaysUp Event Log Messages page explains the messages that may appear.

  • Browse the AlwaysUp FAQ for answers to commonly asked questions and troubleshooting tips.

  • Contact us and we will be happy to help!

Download & Try it Free!

Download AlwaysUp and Run as a Service Today! Version 15.5 New!

8.0 MB Installer
Our 12,000+ customers include...
Compatible with Windows 11 Compatible with Windows Server 2022 Compatible with Windows 10
Over 94,000 installations, and counting!
 
AlwaysUp is number 1! Run as a Service with AlwaysUp

Rock-solid for the past 19+ years!