|
|
Version
16.5 8.9 MB Installer |
|
|
Learn how AlwaysUp installs and runs your application, batch file or script 24/7 as a true, set it and forget it Windows ServiceThank you for your interest in AlwaysUp! By now you've probably grasped the basic idea — that AlwaysUp was created to help you run your application as a Windows Service, starting it promptly at boot and keeping it operating 24/7/365. The purpose of this article is to take you to the next level of understanding. To peek at the internals, and paint a picture of how AlwaysUp will help you achieve your goal of 100% uptime. In this article...
1. A high-level overview of AlwaysUpThis diagram shows the main players & components involved as you work with AlwaysUp. Important areas will be highlighted in the sections that follow: 2. You install your application as a Windows Service with the AlwaysUp GUI/Console programAfter installing AlwaysUp, your first step will be to tell AlwaysUp about the application you wish to run as a service. You will perform this task with the AlwaysUp GUI/Console — a regular Windows program accessible from this desktop icon: The program is named AlwaysUp.exe and it lives in the AlwaysUp installation folder (C:\Program Files (x86)\AlwaysUp): To setup your application with the GUI/Console, you will either:
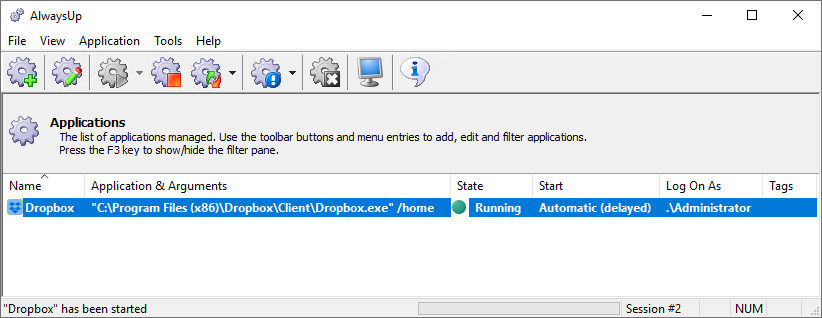
The result will be a new entry in the AlwaysUp window. Here we see the popular Dropbox cloud storage application configured to run as a Windows Service with AlwaysUp: For each application you configure in the AlwaysUp GUI/Console, a true Windows Service is created. Each of these services will be listed in the Services Control Panel application. The name of the underlying service will be the name you specified in AlwaysUp, plus a special suffix. For example, if you created "Dropbox" (as in the screenshot above), the corresponding service will be named "Dropbox (managed by AlwaysUpService)": Each service will run the AlwaysUp Service Component, described in the next section. 3. The AlwaysUp Windows Service Component automatically launches & babysits your applicationWhen your computer boots, Windows launches all services designated to start automatically — including the services created by the AlwaysUp GUI/Console. Each service created by AlwaysUp runs the AlwaysUp Windows Service Component — a service wrapper responsible for running your application as a Windows Service. The Service Component will:
Note that the Service Component does not display any windows or tray icons. It runs entirely in the background, like any well-designed Windows Service should. Of course, you will be able to see the Service Component's process (AlwaysUpService.exe) at work in the Task Manager or in Process Explorer. This screenshot shows the arrangement after AlwaysUpService.exe has started Dropbox as a service in Session 0: 4. Your application runs continuously in the backgroundThe AlwaysUp Windows Service Component will run your application in the isolated Session 0 — the background session housing all Windows Services. As a result, your application's windows, popups or tray icon will not appear on your desktop. If you wish to see your application, you can instruct AlwaysUp to restart it visibly in your current login session. That option is available in the GUI/Console program under the "Application" menu: AlwaysUp will quickly stop your program in Session 0 and restart it on your desktop. Your application's GUI elements will appear in a few seconds. Note that despite being invisible, your application should operate normally — with full access to the network, printers, drives and anything else it needs to do its work. 5. You control your application/service from AlwaysUp, Services.msc, NET.EXE and SC.EXEOnce you setup your application in AlwaysUp, you will be able to start, stop and restart it from the AlwaysUp GUI/Console. Those operations are available under the "Application" menu (see above). However, because AlwaysUp has created a genuine Windows Service wrapping your application, you will be able to do much more! For example, you can open the Services Control Panel (Services.msc) and start, stop or restart your application from there: Or if you prefer to work from the command line or a batch file, the built-in Windows NET command is at your disposal. Simply provide the full service name — with the "(managed by AlwaysUpService)" suffix — and you will be good to go: You can also enlist the SC command, which will allow you to start/stop the service from a remote computer. Hopefully this peek inside AlwaysUp has been helpful! Please be sure to get in touch if you have any questions. |
Download & Try it Free!Buy it Now
Fully Compatible with 160+ Applications...
and many more! | ||||||


